If you are a gardening enthusiast, especially someone who enjoys growing traditional root crops or unique Asian vegetables, taro is a plant worth trying. Besides producing a delicious, starchy crop for the kitchen, taro makes a striking addition to the garden with its large, heart-shaped green leaves. Its lush tropical appearance can add a bold, eye-catching touch to a backyard, patio, or container garden
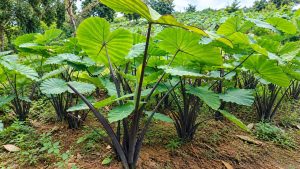
Based on years of hands-on experience growing this versatile plant in both backyard gardens and containers, this guide covers everything from choosing healthy corms and planting them properly to watering, fertilizing, harvesting, and storing your crop. With the right growing conditions and a little patience, you can enjoy a healthy taro harvest right at home.
Understanding the Taro Plant: Biology and Ideal Growing Conditions
Before you grab a shovel or prepare a container, it helps to understand how taro naturally grows. Providing conditions that closely match its preferred environment can make a big difference in plant health and corm production.
Origin and Natural Characteristics
Scientifically known as Colocasia esculenta, taro belongs to the Araceae, or arum, family. It is a perennial herbaceous plant grown mainly for its underground starchy corms, although some varieties are also grown for their edible leaves. The root system is relatively shallow but spreads outward, while the underground stem develops into the large, nutrient-rich corm that we harvest.
Ideal Climate and Weather Conditions
- Temperature: Taro is a warm-weather plant that grows best in temperatures between 68°F and 95°F (20°C and 35°C). It does not tolerate frost or freezing temperatures well. If you live in an area with cold winters, plan to grow taro during the spring and summer or grow it in containers that can be protected from cold weather.
- Moisture and Sunlight: Taro naturally grows in moist environments such as wetlands, stream banks, and other tropical and subtropical areas. It can grow in full sun to partial shade, but consistent moisture is especially important. Taro is a thirsty plant and performs best when the soil stays evenly moist.
Preparation: The Foundation of a Bountiful Harvest
Good preparation at the beginning can prevent many problems later as the plant becomes larger and develops its corms.
Selecting Quality Seed Corms
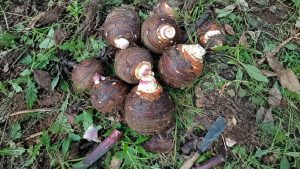
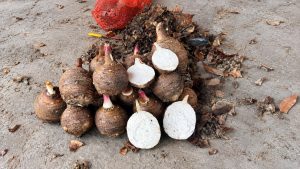
Your results depend heavily on the quality of the planting material. If you are buying taro corms from an Asian grocery store, farmers market, or nursery, look for the following:
- Choose corms that feel firm and heavy, without soft spots, rot, or visible mold.
- Examine the surface carefully and look for small, healthy sprouting eyes. These are the points where new shoots will emerge.
- Avoid corms that have been peeled or stored in the refrigerator for an extended period, as their ability to sprout may be greatly reduced.
Preparing the Soil: The Secret to Large, Clean Corms
Taro is fairly adaptable when it comes to soil, but good soil preparation can encourage stronger growth and better corm development.
- Loose and nutrient-rich: The soil should contain plenty of organic matter and remain loose enough for the corms to expand freely. You can improve native garden soil with aged compost, worm castings, coco coir, or other well-decomposed organic material.
- Moisture retention and drainage: Taro needs consistently moist soil, but that does not mean the roots should sit in stagnant water. Poor drainage can increase the risk of root and corm rot.
- Ideal pH: Taro generally prefers slightly acidic soil with a pH between 5.5 and 6.5.
Choosing Your Growing Method: In-Ground vs. Containers
- Direct In-Ground Planting: Choose a spot that receives at least 6 hours of direct sunlight each day. Space plants about 2 to 3 feet (60 to 90 cm) apart because mature taro plants can develop large, spreading leaves.
- Container Gardening: If you do not have a backyard, taro can grow well in a large container. Choose a pot that holds at least 5 to 8 gallons (20 to 30 liters) and has a top diameter of at least 16 inches (40 cm). This gives the corm enough room to develop. Make sure the container has drainage holes at the bottom.
Step-by-Step Taro Planting Guide
Planting taro corms is fairly simple, but paying attention to each step can help the plant get off to a strong start.
Step 1: Pre-Sprouting (Optional)
You can plant taro corms directly in the soil, but pre-sprouting can help shorten the waiting period and give the young plant a stronger start.
- Place the taro corms on a shallow tray lined with damp sand or paper towels.
- Keep the tray in a warm, bright location away from direct sunlight. Keep the growing medium slightly moist for about 7 to 10 days, or until the sprouts reach roughly 0.5 to 1 inch (1 to 2 cm) long.
Step 2: Planting the Corms
- For in-ground planting, dig a hole about 4 to 6 inches (10 to 15 cm) deep. For containers, fill the pot about two-thirds full with prepared soil.
- Place the taro corm horizontally or position the sprouting eyes facing upward. Planting it horizontally can allow the shoots to emerge more easily as they grow.
- Cover the corm with 2 to 3 inches (5 to 7 cm) of soil. Press the soil down gently, but avoid compacting it too tightly.
Step 3: Initial Watering
Water the newly planted corm thoroughly immediately after planting. This helps settle the soil around the corm and gives the developing roots access to consistent moisture.
Daily Care Techniques for Maximum Yield
Taro is relatively easy to care for, but paying attention to moisture, nutrition, and overall plant health can help encourage larger, healthier corms.
Watering: The “Thirsty Plant”
- Taro naturally prefers moist conditions, so do not allow the soil to dry out completely.
- During hot summer weather, plants may need watering once or twice a day, particularly when grown in containers. Check the soil regularly and water when the surface begins to dry.
- Pro Tip: Apply a layer of organic mulch, such as straw or shredded leaves, around the plant. Mulch helps slow evaporation, maintain soil moisture, and keep the root zone cooler during hot weather.
Fertilization Schedule
Taro produces a large amount of foliage while also developing a substantial underground corm, so it benefits from a steady supply of nutrients throughout the growing season.
- Early Stage (Seedling): Once the shoots have emerged and developed 3 to 4 leaves, apply a nitrogen-rich organic fertilizer, such as well-composted manure or worm castings, to encourage healthy leaf and root growth.
- Middle Stage (Bulking): Around the third to fifth month, as the plant becomes more established and begins putting more energy into corm development, use a balanced fertilizer that provides phosphorus and potassium along with other essential nutrients. Follow the product label for application rates and frequency.
Weeding and Hilling Up
- During the early stages of growth, weeds can compete with young taro plants for water, nutrients, and space. Remove weeds regularly before they become established.
- As the plants grow, you can hill up the soil by adding about 1 to 2 inches (3 to 5 cm) of soil or compost around the base. This can help support the plant and provide additional soil around the developing corms.
Pest and Disease Management
Taro is generally a hardy plant, but it can still experience occasional pest and disease problems.
- Leaf-chewing pests and mealybugs: These pests may occasionally appear on or underneath the large leaves. A strong spray of water can dislodge many small pests. Insecticidal soap can also be used when appropriate, following the product label.
- Root and Corm Rot: This problem is often associated with poorly drained soil or prolonged waterlogging. Make sure garden beds and containers drain properly while still providing the consistently moist conditions taro prefers.
Harvesting and Storing Taro
After months of growth, harvest time is one of the most rewarding parts of growing taro at home.
Signs That Taro Is Ready to Harvest
- The growing season typically lasts 6 to 8 months, although the exact timing varies with the variety and growing conditions.
- One of the clearest signs of maturity is when the leaves begin to yellow, dry, droop, and naturally die back. At this stage, much of the plant’s energy has shifted back toward the underground corm.
Harvesting Techniques
- Choose a dry, sunny day for harvesting. Avoid digging when the soil is extremely muddy because wet soil can cling heavily to the corms and make post-harvest handling more difficult.
- Use a garden fork or small shovel to loosen the soil in a circle about 8 to 12 inches (20 to 30 cm) from the base of the plant. This reduces the chance of accidentally cutting or damaging the corms.
- Once the surrounding soil has been loosened, gently lift the entire taro clump from the ground.
Post-Harvest Handling and Storage
- Brush away excess soil and trim the stems to about 1 inch (2 to 3 cm) above the crown.
- Cure the corms by placing them in a shaded, dry, well-ventilated area for several days. This allows the outer skin to dry and toughen.
- Store the corms in a cool, dark, dry location. If you plan to use them relatively soon, they can also be stored in the refrigerator’s crisper drawer.
Practical Tips from Experience
- Handle with Care (Sap Caution): Raw taro contains calcium oxalate crystals that can cause significant skin and mouth irritation. Wear gloves when peeling or preparing raw taro, and avoid tasting it raw. Taro should be properly cooked before eating.
- Maximizing Space: If you have a sunny apartment balcony or patio, a large container of taro can provide homegrown food while also adding lush, tropical-looking greenery to your outdoor space.
Gardening is about more than the final harvest. The process of watching a small corm develop into a large, leafy plant can be just as rewarding. With consistent moisture, good soil, and plenty of warm weather, growing your own fresh taro at home can be a satisfying gardening project.
Frequently Asked Questions About Taro
How long does taro take to grow?
Taro usually takes about 6 to 8 months to mature, depending on the variety, climate, and growing conditions.
Does taro need full sun?
Taro grows well in full sun to partial shade. In hot climates, some afternoon shade can help protect the large leaves from excessive heat.
How often should you water taro?
Taro prefers consistently moist soil. Check the soil regularly and water whenever the surface begins to dry, especially during hot weather.
Can you grow taro in a container?
Yes. Taro grows well in large containers as long as the pot provides enough room for the corms and has good drainage.
When is the best time to harvest taro?
Taro is generally ready to harvest when the leaves begin to yellow, droop, dry out, and naturally die back, usually around 6 to 8 months after planting.