Chives are one of the easiest herbs to grow and one of the most versatile plants to keep in a home garden. With slender green leaves and a mild onion-like flavor, chives can be used to season everything from eggs and potatoes to soups, salads, sauces, and seafood. Beyond their culinary value, chives also contain vitamins, minerals, antioxidants, and sulfur-containing plant compounds that contribute to their nutritional and potential medicinal value.
As a member of the Allium genus, chives are related to onions, garlic, shallots, and leeks. They have also been used traditionally as both a food herb and a plant associated with general wellness. Today, chives are valued primarily as a fresh culinary herb, but their natural compounds continue to attract interest in nutritional and botanical research.
Table of Contents
- 1. What Are Chives?
- 2. Scientific Name and Other Names
- 3. Origin and Botanical Characteristics
- 4. Nutritional Content and Active Compounds
- 5. Medicinal Properties of Chives
- 6. Potential Benefits and Uses
- 7. Chives in Traditional Medicine
- 8. Chives as Both a Medicinal Herb and Culinary Herb
- 9. How to Use Chives
- 10. How to Use Chives in Cooking
- 11. Precautions and Possible Side Effects
- 12. How to Grow and Care for Chives
- Conclusion
1. What Are Chives?
Chives are a perennial herb grown mainly for their narrow, hollow green leaves and mild onion flavor. Unlike onions, chives do not produce a large bulb. Instead, they grow in dense clumps from small underground bulbs and can be harvested repeatedly throughout the growing season.
The leaves have a delicate flavor that is milder than mature onions, making them suitable for dishes where a subtle onion taste is preferred. Chives are usually chopped and added fresh to food, although they can also be dried for later use.
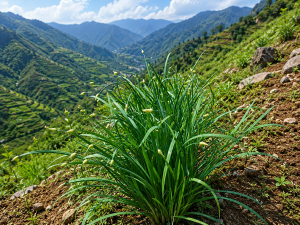
The plant produces attractive purple-pink flowers in rounded clusters during the warmer months. These flowers are edible and can be used in salads or as a garnish. They are also attractive to bees and other pollinating insects.
Because chives are hardy, compact, and easy to maintain, they are an excellent herb for beginners and can be grown in garden beds, containers, or small kitchen gardens.
2. Scientific Name and Other Names
The scientific name of common chives is Allium schoenoprasum L.
Common names include:
- Chives
- Common chives
- Garden chives
Chives belong to the Amaryllidaceae family and the Allium genus, which also includes onions, garlic, shallots, and leeks.
Chives are sometimes confused with garlic chives, scientifically known as Allium tuberosum. Although both plants are edible herbs, they are different species. Common chives have thin, hollow leaves and a mild onion flavor, while garlic chives have flat leaves and a more noticeable garlic-like taste.
3. Origin and Botanical Characteristics
Chives are native to regions of Europe, Asia, and North America. They have been cultivated for a long time and are now grown in gardens throughout many temperate regions of the world.
The plant is a hardy perennial that forms compact clumps of green, tubular leaves. Depending on growing conditions, the leaves can reach several inches in height. Small underground bulbs allow the plant to survive from one growing season to the next.
In late spring and summer, mature plants produce round flower heads made up of many small purple, pink, or violet flowers. The flowers are edible and can add color and flavor to salads and other dishes.
Chives grow best in fertile, well-drained soil with full sun to partial shade. Once established, they require relatively little maintenance and can remain productive for several years.
4. Nutritional Content and Active Compounds
Chives are generally consumed in small quantities, so they are not a major source of calories, protein, or carbohydrates. However, they can contribute useful nutrients and plant compounds to the diet.
Chives contain:
- Vitamin K
- Vitamin C
- Vitamin A-related carotenoids
- Folate
- Calcium
- Potassium
- Magnesium
- Iron
They also contain flavonoids, polyphenols, and sulfur-containing compounds that are characteristic of many plants in the Allium family.
These naturally occurring compounds are of interest because some have antioxidant activity. Antioxidants help protect cells from oxidative stress caused by unstable molecules known as free radicals.
The exact nutritional and phytochemical content of chives can vary according to variety, soil, climate, maturity, and growing conditions. Since chives are normally eaten as a seasoning or garnish, their greatest nutritional contribution comes from adding variety and beneficial plant compounds to an overall balanced diet.
5. Medicinal Properties of Chives
Chives have traditionally been regarded as a useful herb for general wellness, partly because they belong to the same plant family as onions and garlic.
The plant contains antioxidant compounds and sulfur-containing phytochemicals that may have biological activity. Research on Allium plants has investigated antioxidant, antimicrobial, and other potential properties, although much of the available evidence comes from laboratory or preliminary studies.
It is important to distinguish between the potential biological activity of plant compounds and proven medical effects in humans. There is currently insufficient clinical evidence to consider chives a treatment for specific diseases.
From a nutritional perspective, however, chives can be a valuable addition to a healthy diet. Their vitamin and mineral content, combined with naturally occurring phytochemicals, makes them more than simply a decorative garnish.
6. Potential Benefits and Uses
Antioxidant Support
Chives contain flavonoids and other plant compounds with antioxidant properties. Including a variety of herbs, vegetables, and fruits in the diet can increase exposure to naturally occurring antioxidants.
Vitamin K
Chives provide vitamin K, which plays an important role in normal blood clotting and bone metabolism. Although a typical serving is small, chives can contribute to overall vitamin K intake.
Nutritional Variety
Fresh herbs such as chives can improve the nutritional diversity of meals. Adding herbs to everyday foods is a simple way to increase the variety of plant foods in the diet.
Flavor Without Excess Salt
Chives have a naturally fresh onion flavor and can help make simple foods more flavorful without relying heavily on salt or rich sauces. This makes them a useful ingredient for people who want to create flavorful meals with simple ingredients.
Potential Digestive Benefits
Chives and other Allium plants have traditionally been associated with digestive wellness. However, strong human clinical evidence showing that chives specifically improve digestion or treat digestive disorders is limited.
Overall, chives are best viewed as a nutritious culinary herb that may contribute to a healthy diet rather than as a medicinal treatment.
7. Chives in Traditional Medicine
Members of the Allium family have a long history of use in traditional food and herbal practices. Chives have traditionally been valued as a food herb and have sometimes been associated with digestive health and general vitality.
Because chives are related to onions and garlic, traditional beliefs about the broader Allium family are sometimes applied to chives. However, these traditional uses should be interpreted carefully.
Modern scientific evidence does not currently support using chives as a replacement for medical treatment. Their traditional value is best understood as part of the long history of using plants as both food and sources of natural compounds.
For everyday use, the most practical role of chives is as a fresh herb that adds flavor, nutrients, and plant compounds to a balanced diet.
8. Chives as Both a Medicinal Herb and Culinary Herb
Chives are an excellent example of a plant that has both culinary and traditional herbal value.
As a culinary herb, chives provide a mild onion flavor that works well with a wide variety of foods. They can be eaten fresh and are usually added near the end of cooking to preserve their delicate taste and aroma.
As a traditional herb, chives are valued because they contain naturally occurring plant compounds, including antioxidants and sulfur-containing phytochemicals.
This dual role makes chives especially useful for home gardeners. A single small patch can provide fresh leaves for cooking while also adding attractive flowers to the garden.
Rather than thinking of chives as a medicinal plant that treats disease, it is more appropriate to view them as a traditional herb with nutritional and phytochemical value that can be incorporated into a healthy lifestyle.
9. How to Use Chives
Fresh chives are best used soon after harvesting. Rinse the leaves gently under cool water, dry them, and cut them into small pieces using a sharp knife or kitchen scissors.
Chives can be used:
- As a garnish for cooked dishes
- Mixed into salads
- Added to soups
- Stirred into scrambled eggs
- Combined with butter or cream cheese
- Mixed into sour cream or yogurt dips
- Added to sauces and dressings
- Paired with fish and seafood
Chives can also be frozen for longer storage. Dried chives are available commercially, although they generally have a weaker flavor than fresh leaves.
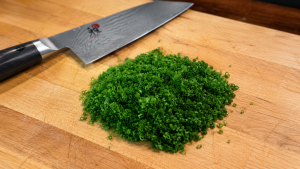
The edible flowers can be separated into individual florets and added to salads or used as a colorful garnish.
10. How to Use Chives in Cooking
Chives are particularly popular in American and European cooking.
Baked potatoes: Sprinkle chopped chives over baked potatoes with sour cream, Greek yogurt, or butter.
Eggs: Add fresh chives to scrambled eggs, omelets, frittatas, or breakfast sandwiches.
Soups: Use chives as a finishing herb for potato soup, creamy vegetable soups, and other warm dishes.
Salads: Mix chopped chives into green salads, potato salads, pasta salads, or homemade dressings.
Dips: Combine chives with sour cream, cream cheese, Greek yogurt, or other ingredients to make flavorful dips.
Fish and seafood: Chives pair especially well with salmon, shrimp, and other mild seafood dishes.
Herb butter: Mix finely chopped chives into softened butter and use it with bread, vegetables, potatoes, or grilled foods.
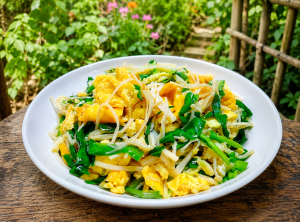
For the best flavor, add fresh chives shortly before serving rather than cooking them for a long time.
11. Precautions and Possible Side Effects
Chives are generally considered safe when eaten in normal food amounts. However, some people may be sensitive or allergic to plants in the Allium family.
Possible concerns include allergic reactions or digestive discomfort, particularly when consumed in unusually large amounts.
People with known allergies to onions, garlic, leeks, or related plants should use caution when trying chives.
Chives also contain vitamin K. People taking anticoagulant medications such as warfarin should maintain a consistent intake of vitamin K-rich foods and discuss significant dietary changes with a healthcare professional.
Chives should not be used as a substitute for medical care. If someone has persistent digestive symptoms, urinary problems, or another health concern, they should seek appropriate medical evaluation rather than relying on chives or other herbs alone.
12. How to Grow and Care for Chives
Chives are one of the easiest perennial herbs to grow, making them an excellent choice for beginner gardeners.
- Sunlight: Choose a location with full sun or partial shade. Around six hours of sunlight per day is generally suitable for healthy growth.
- Soil: Plant chives in fertile, well-drained soil. Adding compost before planting can improve soil fertility and structure.
- Planting: Chives can be grown from seeds, young plants, or divisions. For faster results, dividing an established clump is often the easiest method.
- Watering: Keep the soil moderately moist while young plants become established. Once mature, chives can tolerate short periods of dry conditions, but regular watering helps maintain tender, productive leaves.
- Fertilizing: Chives do not require heavy feeding. A layer of compost around the plants in spring is usually sufficient.
- Harvesting: Cut leaves with clean scissors when they are large enough to use. Cut them several inches above the soil to encourage continued growth.
- Dividing: Mature clumps can become crowded after several years. Dig up the plant, divide the root mass into smaller sections, and replant each section in fresh soil.
With basic care, chives can produce fresh leaves for many years. Regular harvesting encourages new growth and helps keep the plant compact.
Conclusion
Chives are a simple but valuable herb that combines culinary versatility, nutritional value, traditional herbal use, and easy cultivation. Their mild onion flavor makes them useful in everything from baked potatoes and eggs to soups, salads, dips, sauces, and seafood.
The plant provides vitamin K, vitamin C, minerals, antioxidants, and naturally occurring sulfur-containing compounds. Although research into Allium plants suggests potential biological benefits, there is not enough clinical evidence to consider chives a treatment for specific diseases.
For most people, the best way to enjoy chives is as part of a balanced diet. They are easy to grow, require little space, and can provide fresh leaves and edible flowers year after year. Whether grown in a garden or a container, chives are an excellent herb for anyone who enjoys fresh food and home gardening.
FAQ: 5 Common Questions About Chives
1. What are chives? Chives are perennial herbs in the Allium genus with thin, hollow leaves and a mild onion flavor.
2. What are the potential health benefits of chives? Chives provide vitamin K, vitamin C, minerals, antioxidants, and beneficial plant compounds.
3. Are chives a medicinal herb? Chives have traditional herbal uses but are mainly used as a culinary herb today.
4. How do you use chives in cooking? Add chopped chives to eggs, potatoes, soups, salads, sauces, dips, fish, and seafood.
5. How do you grow chives at home? Grow chives in full sun or partial shade, fertile well-drained soil, and water regularly. Harvest leaves as needed.
References
- U.S. Department of Agriculture (USDA), FoodData Central. Nutritional data for chives and related foods.
- Royal Botanic Gardens, Kew. Plants of the World Online. Allium schoenoprasum L.
- National Center for Biotechnology Information (NCBI), PubMed. Research literature on Allium species, phytochemicals, antioxidants, and biological activity.
- National Institutes of Health (NIH), Office of Dietary Supplements. Vitamin K: Fact Sheet for Health Professionals.
- Royal Horticultural Society (RHS). Gardening and cultivation information for chives and perennial herbs.