Learning how to cut a mango is easy once you know how to work around the large, flat pit in the center. With a sharp knife and a few simple techniques, you can quickly cut a mango into cubes, slices, or bite-sized pieces without wasting too much of the juicy flesh.
Whether you want to prepare mango for a fruit salad, smoothie, dessert, salsa, or a quick snack, this step-by-step guide will show you how to cut a mango safely and easily.
What You Need to Cut a Mango
Before cutting your mango, prepare:
- 1 ripe mango
- A sharp kitchen knife
- A sturdy cutting board
- A large spoon
- A vegetable peeler, if you want mango slices
Choose a mango that is ripe but not overly soft. A slightly firm mango is easier to cut and will hold its shape better.
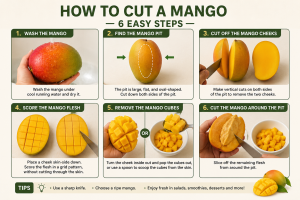
1. Wash the Mango
Start by washing the mango under cool running water.
Gently rub the surface of the mango with your hands to remove dirt and any residue from the skin. Even if you plan to remove the peel, washing the fruit before cutting helps prevent dirt from transferring to the edible flesh.
Dry the mango with a clean kitchen towel and place it on a stable cutting board.
Make sure your cutting board does not move around while you are working. A stable surface makes cutting safer and easier.

2. Find the Mango Pit
The next step in learning how to cut a mango is finding the pit.
A mango has a large, flat, oval-shaped pit running vertically through the center of the fruit. Unlike some fruits, you cannot simply cut straight through the middle of a mango.
Place the mango upright on the cutting board. Look at its shape and identify the direction of the flat pit inside.
The goal is to cut down both sides of the pit, leaving the center section with the pit intact.
Once you understand where the pit is located, cutting a mango becomes much easier.
3. Cut Off the Mango Cheeks
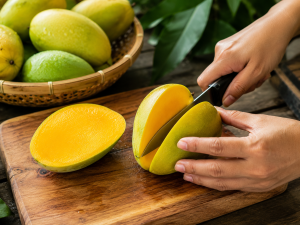
Hold the mango firmly with one hand, keeping your fingers away from the blade.
Using a sharp knife, make a vertical cut about ¼ to ½ inch away from the center of the mango. Slice downward from the top toward the bottom, following the side of the pit.
Turn the mango around and repeat the same process on the opposite side.
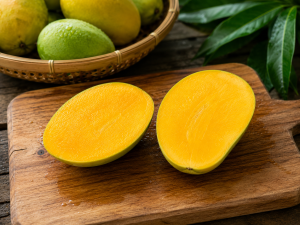
You should now have two large pieces of mango flesh. These are called mango cheeks.
The remaining center section contains the mango pit and usually has some flesh attached to it.
The mango cheeks contain most of the edible flesh, making them the easiest parts to cut into cubes or slices.
4. Score the Mango Flesh
Place one mango cheek on the cutting board with the skin facing down and the flesh facing upward.
Using your knife, carefully make several lengthwise cuts through the mango flesh. Then make several crosswise cuts to create a grid pattern.
Do not cut all the way through the skin.
The size of the cubes depends on how you plan to use the mango. For fruit salads, yogurt, or desserts, smaller cubes work well. For eating as a snack, you can make larger pieces.
Repeat the same process with the second mango cheek.
Be careful when scoring the mango, especially if the fruit is very ripe and slippery. Keep your fingers away from the knife blade and work slowly.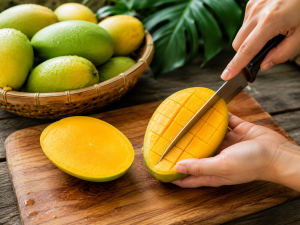
5. Remove the Mango Cubes
Once you have scored the mango flesh, you can remove the cubes from the skin.
There are two simple methods you can use.
Method 1: Scoop With a Spoon
Hold the mango cheek firmly and use a large spoon to separate the flesh from the skin.
Insert the spoon close to the skin and gently move it around the inside of the mango cheek. Try to keep the spoon as close to the skin as possible so you can remove as much flesh as possible.
Transfer the mango cubes to a bowl or plate.
This is one of the easiest methods for cutting a very ripe mango because the soft flesh can be removed without using a knife.
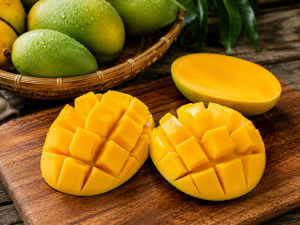
Method 2: Use the Hedgehog Method
After scoring the mango, gently press the skin from underneath with your fingers.
The mango cheek will turn inside out, pushing the cubes upward and making them easier to remove.
You can then use your knife to cut the cubes away from the skin or remove them with a spoon.
This method is commonly called the hedgehog method because the raised mango cubes can resemble the spikes of a hedgehog.
6. Cut the Mango Around the Pit
After removing both mango cheeks, you will be left with the center section containing the pit.
There is usually still some edible mango flesh attached to the pit, so you can carefully remove it to reduce food waste.
Hold the center section securely and use your knife to slice the remaining flesh away from the pit.
Rotate the mango pit as you work, cutting away the edible pieces from different sides.
Because the pit can be slippery, take your time and avoid trying to force your knife through the hard center.
You can cut the remaining mango flesh into small pieces or simply eat it directly from the pit.
At this point, you have successfully completed all 6 steps for how to cut a mango.
How to Cut a Mango Into Slices
If you prefer mango slices instead of cubes, you can use a slightly different technique.
First, follow Steps 1 through 3 to cut the mango cheeks away from the pit.
Then place each mango cheek on the cutting board with the skin facing down. Instead of scoring the flesh into a grid, carefully slice the mango flesh lengthwise.
You can then separate the slices from the skin using a spoon or knife.
For cleaner slices, you can also peel the mango with a vegetable peeler before cutting it. This method works best when the mango is ripe but still firm.
Tips for Cutting a Mango
For the best results, keep these simple tips in mind:
Use a sharp knife. A sharp knife makes it easier to cut through the mango flesh and reduces the need to apply excessive pressure.
Choose the right ripeness. A mango that is too hard can be difficult to cut, while an overly soft mango may become messy. Slightly soft mangoes are usually ideal.
Use a stable cutting board. Make sure your cutting board is placed on a flat surface before you begin.
Do not cut directly through the pit. The mango pit is hard and flat. Always cut along both sides of it.
Take your time. Mangoes can become slippery as you cut them, so work carefully and keep your fingers away from the knife.
How to Store Cut Mango
After cutting your mango, place the pieces in an airtight container and store them in the refrigerator.
For the best taste and texture, enjoy freshly cut mango within a few days.
If you have more mango than you can eat, you can freeze it. Cut the mango into cubes or slices and arrange the pieces in a single layer on a tray. Freeze until firm, then transfer the pieces to a freezer-safe container or bag.
Frozen mango is especially useful for smoothies, homemade popsicles, and other frozen desserts.
Frequently Asked Questions
What Is the Easiest Way to Cut a Mango?
The easiest method is to cut the mango cheeks away from the pit, score the flesh into cubes, and then scoop the cubes from the skin with a spoon.
How Do You Cut a Mango Without a Mango Slicer?
You do not need a special mango slicer. A sharp kitchen knife and a spoon are enough to cut a mango into cubes or slices.
Can You Cut a Mango Before It Is Fully Ripe?
Yes, but an unripe mango is firmer and may be more difficult to cut. It is usually easier to cut a mango when it has softened slightly but is not overly mushy.
How Do You Cut a Mango Into Cubes?
Cut the mango cheeks from both sides of the pit. Score the flesh in a grid pattern without cutting through the skin, then scoop the cubes away from the skin with a spoon.
Can You Eat Mango Skin?
Mango skin is technically edible, but many people prefer to remove it because it can have a tough texture and slightly bitter taste.
Final Thoughts
Learning how to cut a mango only takes a few simple steps. First, wash the mango and locate the large, flat pit. Next, cut the two mango cheeks away from the pit, score the flesh into cubes, and remove the pieces from the skin. Finally, cut away any remaining flesh around the pit.
Once you master these 6 easy steps, you can quickly prepare fresh mango for snacks, fruit salads, smoothies, desserts, salsa, and many other recipes. With a sharp knife and a little practice, cutting a mango at home becomes simple, quick, and mess-free.